
Why Pandavas Chose Ardhachandra Vyuha on Day 3
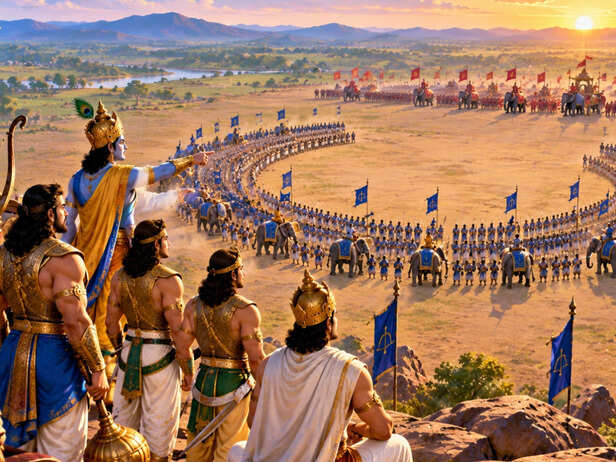
The third day of the Kurukshetra war brought a striking clash of battle formations. The Pandavas arranged their army in the shape of a half-moon, known as the Ardhachandra Vyuha, while the Kauravas adopted the Garuda Vyuha, shaped like an eagle. But the real story is not just about the shapes. The Pandavas placed their strongest warriors at carefully chosen positions, while Yudhishthira stood protected at the centre. The formation was designed so that an attack on the king could trigger a counterattack from both sides.
The Half-Moon Formation Appeared Again
The Ardhachandra Vyuha, or half-moon formation, was one of the battle arrangements described in traditions surrounding the Kurukshetra war. According to the account, the Pandavas used this formation on the third day, and it was also associated with later days of the war. Its curved shape was useful for positioning powerful warriors along both sides while keeping an important figure protected near the centre. The formation was not about appearance alone. Every position had a purpose, and the placement of commanders could determine whether an enemy attack succeeded or became an opportunity for a counterattack.
Bhima Guarded One Side
On one side of the Ardhachandra formation stood Bhima, supported by forces associated with Drupada and Virata. Bhima was known for his immense physical strength and aggressive fighting style, making him a natural choice for a powerful section of the army. Behind the basic structure of the formation was a larger idea: the outer sections needed warriors capable of resisting a strong enemy push. If the Kaurava forces attempted to break through this side, Bhima and his supporting armies could hold their position while the rest of the formation responded.
Warriors Filled the Inner Wings
Moving inward from the side commanded by Bhima, the formation included warriors such as King Neela, Dhrishtaketu and fighters associated with the Chedi and Kashi forces, according to the traditional account. These positions connected the outer edge with the central section. Their role was important because an enemy force attempting to push toward Yudhishthira would have to cross several layers rather than reaching the centre immediately. The arrangement created depth within the formation, giving the Pandavas more than one line of resistance and making a direct assault much harder.
Arjuna Held the Other Wing
On the other side, Arjuna led the Pandava forces. Behind him stood warriors including Ghatotkacha and the princes of the Kekaya kingdom. Placing Arjuna on a major outer section gave the formation another formidable defensive and attacking force. His position also meant that an enemy advance from this side would face one of the Pandavas’ most capable warriors. The two powerful wings, associated with Bhima and Arjuna, created balance around the centre. Instead of concentrating every major warrior in one location, the formation spread strength across both sides.
Abhimanyu Protected the Inner Side
Closer to the centre stood Abhimanyu, Iravan and the Upapandavas, including the sons of Draupadi known as the Draupadeyas. Their placement added another layer between the outer wings and Yudhishthira. The formation therefore worked like a series of protective sections rather than one simple line. If the enemy pushed inward, these warriors could respond before the attack reached the king. The presence of experienced and younger warriors together also gave the formation different kinds of fighting strength. Each section contributed to keeping the central position secure.
Yudhishthira Was the Centre of the Plan
The most important part of the formation was its centre, where Yudhishthira stood. Dhrishtadyumna and Shikhandi were positioned around this central area, with elephants forming an additional protective barrier. This was crucial because Yudhishthira was the Pandava king, making his safety a major concern during the battle. The centre was therefore not left exposed. Instead, it became the strongest protected point of the formation. Anyone trying to reach Yudhishthira would have to pass through multiple groups of warriors before getting close to him.
The Trap Was in the Shape
The clever part of the Ardhachandra strategy was its curved structure. If the Kaurava army attacked Yudhishthira in the centre, the Pandava warriors positioned on both sides could move inward and put pressure on the attacking force. In simple terms, the enemy could find itself moving into the middle of a formation that was prepared to close from both directions. That made the centre look like a target while also turning it into a potential trap. The Pandavas were not simply protecting Yudhishthira; they were using his position to shape the battlefield.
The Battle Strategy
The clash between the Ardhachandra Vyuha and Garuda Vyuha shows why the Kurukshetra war is remembered not only for individual warriors but also for military strategy. The Pandavas’ half-moon formation placed Bhima and Arjuna on the major wings, surrounded Yudhishthira with layers of warriors and created the possibility of attacking an advancing enemy from both sides.
The lesson is simple: a strong formation is not just about where warriors stand. It is about what happens when the enemy moves. On the battlefield, every position could become part of the next move.
Unlock insightful tips and inspiration on personal growth, productivity, and well-being. Stay motivated and updated with the latest at My Life XP.